 |
|

01-05-2012, 08:18 PM
|
|
|
|
Join Date: Aug 2009
Posts: 425
|
|
 Reloading benches/ tables
Just going to be building or buying my new Gun reloading bench. Just wondering if guys would be able to post pictures of what they have and what works for a reloading table/ bench. Also if you know anyone around the Edmonton area that might customize and build one for me. Thanks for the pics and info....
|
01-05-2012, 08:21 PM
|
 |
|
|
Join Date: Aug 2009
Location: Medicine Hat
Posts: 1,419
|
|
Pm hawkeye on the forum here... He builds a awesome bench and will sell you one for a really good price!!!
|
01-05-2012, 08:22 PM
|
|
|
|
Join Date: Dec 2008
Location: Camrose
Posts: 45,161
|
|
Make it as stable as possible, and either make it heavy, or bolt it down. I built mine with 2x4s and 1" plywood, and tied it all together with wood screws and bolts. I have about 200lbs of weight on mine to stabilize it.
__________________
Only accurate guns are interesting.
|
01-05-2012, 08:48 PM
|
 |
|
|
Join Date: Nov 2007
Location: North of Edmonton somewhere
Posts: 732
|
|
Quote:
Originally Posted by elkhunter11

Make it as stable as possible, and either make it heavy, or bolt it down. I built mine with 2x4s and 1" plywood, and tied it all together with wood screws and bolts. I have about 200lbs of weight on mine to stabilize it.
|
Cute press... I still love my Redding.  
|
01-05-2012, 09:47 PM
|
|
Banned
|
|
Join Date: Jul 2009
Posts: 371
|
|
Bench
Added RCBS Chargemaster combo, dont use the Lyman anymore. Redding Ultramag and T7 press.
|
01-06-2012, 02:04 AM
|
|
|
|
Join Date: Oct 2010
Location: Near Drumheller
Posts: 6,765
|
|
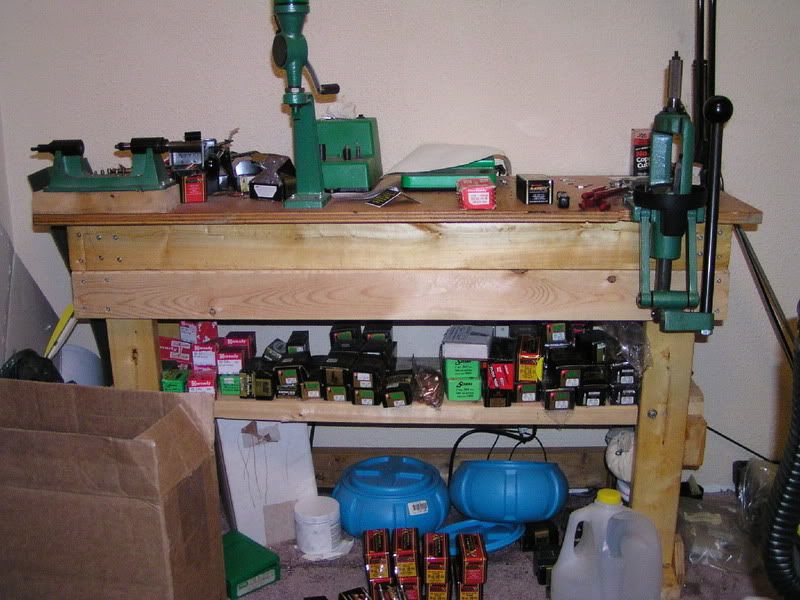
This is an NRMA 0r NMRA bench, plans are avail online. I am going to have to pull it away from the wall on the right and build another bench along the right side, likely 30" x 8ft. Thinking of permanantly mounting the lube/ sizer and adding another press onto it and some more cupboards, as this one is FULL now.
Has a small wood vice on the left,use that for cleaning guns, lube/ sizer clamps in it for the moment.
Powder thrower is mounted to a Jorgensen clamp which allows me to take it to the range with me. Scale is at eye level when sitting.
|
01-06-2012, 11:55 AM
|
 |
Gone Hunting
|
|
Join Date: Sep 2010
Location: North of Peace River
Posts: 11,346
|
|
I built my reloading bench from salvaged materials.
the ends of 4x6 sign posts for legs and replaced signs for shelving and top.
The shelves and top are therefor made from 3/4 marine grade Crezon.
The top is two layers so it is 1 1/2 inches thick.
I don't know what it weighs but it is very heavy. I can lift one end, but just barely. My guess would be overall weight at around 300 lb, bare.
It's not fancy, but it is rock solid and should last my lifetime and then some.


|
01-06-2012, 12:19 PM
|
 |
|
|
Join Date: Mar 2009
Location: Medicine Hat
Posts: 3,216
|
|
Quote:
Originally Posted by 32-40win
This is an NRMA 0r NMRA bench, plans are avail online. I am going to have to pull it away from the wall on the right and build another bench along the right side, likely 30" x 8ft. Thinking of permanantly mounting the lube/ sizer and adding another press onto it and some more cupboards, as this one is FULL now.
Has a small wood vice on the left,use that for cleaning guns, lube/ sizer clamps in it for the moment.
Powder thrower is mounted to a Jorgensen clamp which allows me to take it to the range with me. Scale is at eye level when sitting.
|
I have a copy of the plans, good to see what it looks like fully assembled. I built a really plain bench a few years ago, using 2x4s and 1" plywood. It won't win any beauty contests but it is solid and functional.
__________________
Participating in a gun buy back program because you think that criminals have too many guns is like having yourself castrated because you think your neighbors have too many kids...
|
01-06-2012, 03:07 PM
|
|
|
|
Join Date: Sep 2008
Location: Sherwood Park
Posts: 413
|
|
Quote:
Originally Posted by 32-40win
This is an NRMA 0r NMRA bench, plans are avail online. I am going to have to pull it away from the wall on the right and build another bench along the right side, likely 30" x 8ft. Thinking of permanantly mounting the lube/ sizer and adding another press onto it and some more cupboards, as this one is FULL now.
Has a small wood vice on the left,use that for cleaning guns, lube/ sizer clamps in it for the moment.
Powder thrower is mounted to a Jorgensen clamp which allows me to take it to the range with me. Scale is at eye level when sitting.
|
Good to see one, I have the plans and will be building mine on Sunday!
|
01-06-2012, 01:23 PM
|
|
Banned
|
|
Join Date: Aug 2008
Posts: 1,391
|
|
Quote:
Originally Posted by elkhunter11
Make it as stable as possible, and either make it heavy, or bolt it down. I built mine with 2x4s and 1" plywood, and tied it all together with wood screws and bolts. I have about 200lbs of weight on mine to stabilize it.
|
When you don't know what your doing do it neatly
|
01-07-2012, 12:25 AM
|
 |
|
|
Join Date: Sep 2010
Location: Vulcan Ab
Posts: 3,871
|
|
Quote:
Originally Posted by gopher
When you don't know what your doing do it neatly
|
Nice positive attitude! ") We need more like you on AO
NOT
|
01-07-2012, 12:34 AM
|
|
|
|
Join Date: Oct 2008
Location: Whitecourt AB
Posts: 3,867
|
|
Well after the trash talk in this thread from I am certainly not posting a picture of mine. I would get laughed out of here. 
Wonderful setups guys. I envy all of you.
__________________
"........In person people are nice, because you can punch them in person. Online they're not nice because you cant."
Jimmy Kimmel
Last edited by deanmc; 01-07-2012 at 12:54 AM.
|
01-07-2012, 12:17 AM
|
|
Gone Hunting
|
|
Join Date: Sep 2010
Location: North of Peace River
Posts: 11,346
|
|
Quote:
Originally Posted by elkhunter11
Make it as stable as possible, and either make it heavy, or bolt it down. I built mine with 2x4s and 1" plywood, and tied it all together with wood screws and bolts. I have about 200lbs of weight on mine to stabilize it.
|
Nice job Elk. Looks plenty solid and I like all the green. RCBS makes good stuff for sure. A class setup.
|
01-06-2012, 12:58 PM
|
 |
|
|
Join Date: Sep 2008
Location: Central Alberta
Posts: 5,062
|
|
Quote:
Originally Posted by lone wolf
I have a copy of the plans, good to see what it looks like fully assembled.
|
I built one, too. It's great. The top just sits on some of that sticky thin rubber stripping that goes under truck caps. I had an issue getting the bottom section through a doorway and so used a metal collar (Totem) for the 4x4 legs on one side. That way, you can tip it sideways and get though an internal doorway. It's solid and I can still get it back out when/if I move.
I put arborite on the top of mine. Easy to clean up. You can find discontinued arborite at building supply stores. Some of it will make your eyes hurt, but you can find a neutral light color with a trip or two.
I'd suggest some additional finger holes in the sliding doors - makes it easier and they're cheap.
I mounted my press at one end and case trimmer at the other and left the rest of it open. Gives me a great place to clean rifles, too.
__________________
"If everything isn't black and white, I say, 'Why the hell not?'" - J.W.
God made man. Sam Colt made them equal.
Make Alberta a better place. Have your liberal spayed or neutered.
|
01-06-2012, 09:38 PM
|
|
|
|
Join Date: Sep 2008
Location: Central Alberta
Posts: 5,062
|
|
Leo, etc.
Nice benches.
It's none of my business, but I see a lot of scales and just thought, with all that stuff we buy, I'd mention how happy I am with my RCBS Chargemaster Combo. It throws to within 1/10 gr. 48 times out of 50 and the other two are obvious on the digital readout. I checked it by hand for a long time until I realized that was a waste of time. If it says xx.x grains, that's what it is. If it displays a heavy charge (say, 2-3/10 over), that's what it is and I pour it back in. I couldn't find one around here for less than $500+, so bought mine online for $300+. From Midwest, I think.
Anyway, it's sure nice to be seating a bullet while the next charge is being prepared by a robot. Darndest thing to watch - it delivers powder fast until it gets close and then it slows and slows and then finishes off with some twitches. Then a little beep, like my microwave.  I can just nicely keep up to it doing other stuff.
__________________
"If everything isn't black and white, I say, 'Why the hell not?'" - J.W.
God made man. Sam Colt made them equal.
Make Alberta a better place. Have your liberal spayed or neutered.
|
01-06-2012, 09:51 PM
|
|
|
|
Join Date: Sep 2011
Location: Grande Prairie, Alberta
Posts: 75
|
|
Check out the custom shooting benches ad on page 38 of the December issue of Alberta outdoorsman!
|
01-06-2012, 10:04 PM
|
|
|
|
Join Date: Dec 2008
Location: Camrose
Posts: 45,161
|
|
Quote:
|
Relax Elk that was in a fortune cookie I taped it to a powder measure
|
In other words, you have absolutely nothing of any value to contribute to this thread. 
__________________
Only accurate guns are interesting.
|
01-06-2012, 10:12 PM
|
|
|
|
Join Date: Feb 2010
Location: Central Alberta
Posts: 2,984
|
|
What a azz hole
|
01-06-2012, 10:19 PM
|
|
Banned
|
|
Join Date: Aug 2008
Posts: 1,391
|
|
Quote:
Originally Posted by elkhunter11
In other words, you have absolutely nothing of any value to contribute to this thread. |
There is so much wrong with your set up elk a grade 10 shop kid could pull off better so no I have nothing to add next time I need advice on equipment you dont have I will be sure to ask you
|
01-06-2012, 10:33 PM
|
|
Banned
|
|
Join Date: Jul 2009
Posts: 371
|
|
Rocky7 did you tweak the setpoints in your rcbs chargemaster ? Its twice as good if you do, and add 1/2" mcdonalds straw in the end of dispenser tube, that way kernels dont bunch up, you will never ever over throw a charge again.
|
01-06-2012, 11:43 PM
|
|
|
|
Join Date: Oct 2008
Location: Whitecourt AB
Posts: 3,867
|
|
Quote:
Originally Posted by gopher
There is so much wrong with your set up elk a grade 10 shop kid could pull off better so no I have nothing to add next time I need advice on equipment you dont have I will be sure to ask you
|
Could we see your bench please?
__________________
"........In person people are nice, because you can punch them in person. Online they're not nice because you cant."
Jimmy Kimmel
|
01-07-2012, 10:27 AM
|
 |
|
|
Join Date: May 2007
Location: Stony Plain
Posts: 6,433
|
|
Quote:
Originally Posted by gopher
There is so much wrong with your set up elk a grade 10 shop kid could pull off better so no I have nothing to add next time I need advice on equipment you dont have I will be sure to ask you
|
Dang I was thinking Elks bench looks alot like mine!
What so wrong with it?
Granted his setup looks a little messy but I think the picture was of your bench and not your setup. There are times my bench looks messy as hell but thats not how it is 95% of the time......Ill take some pictures when I get time of a sweet press mount my pops "Conan" welded up for me, really makes a solid mounting surface and extends out the bolt holes for better leverage which fatiges the bench a bunch less!!
I too have the chargemaster ....got it this summer and it is one slick machine much better than using a powder scoop and the "tap tap tap" hand and finger trickler.
I would say I can load up 50 chells in about half the time it use to take me.
I have found that certain powders flow/trickle better than others but I don't find it to be a big deal to use a scoop and pull out two or three individial grains of powder I would say 80% are perfect to the grain ......that said I will look into the McDonalds straw trick.
Mike

|
01-02-2017, 01:13 AM
|
 |
|
|
Join Date: Jan 2011
Location: Fort St. John B.C
Posts: 39
|
|
[IMG]  [/IMG]
Last edited by Northern Farm Kid; 01-02-2017 at 01:18 AM.
|
01-16-2012, 09:33 AM
|
|
Banned
|
|
Join Date: Apr 2010
Location: Rimbey, AB
Posts: 671
|
|
Reloading bench
Here is a picture of the reloading bench that I built. It is very heavy but is free standing and designed to take apart for moving. The bench top is a 3'x 7' solid core, melamine covered door. Don't know if they are still available but 30mm, melamine covered, MDF board would be a good alternative. Melamine kitchen cabinets are fastened to a frame made of melamine covered MDF shelves and kitchen cabinet side pannel. There are 1' wide shelves behind the lower cabinets and under the upper cabinets for extra storage of longer components. Was going to add a hanger for cleaning rods but had to give up bench when we moved into an apartment.
[IMG]  [/IMG]
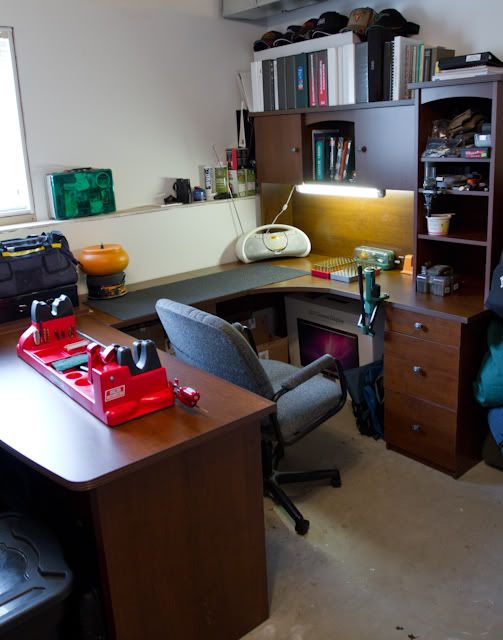
This is my apartment sized reloading bench. It is a 2'X4' desk that I made using kitchen cabinets. The press is mounted on a 2'x2' piece of 30mm, melamine covered MDF board, that is clamped to the desk. On top is a spare night table that I made with melamine covered shelving. My RCBS ChargeMaster is sitting on top of a small filing cabinet. I don't have room to permanently attach a trimmer but it can be clamped on. This setup could be bit heavier, or fastened to a wall, but works OK as is.
[IMG]  [/IMG]
|
01-16-2012, 01:33 PM
|
 |
|
|
Join Date: Oct 2007
Location: Morningside
Posts: 1,042
|
|
__________________

|
01-16-2012, 05:12 PM
|
 |
|
|
Join Date: Sep 2008
Location: Red Deer Alberta
Posts: 783
|
|
Here's my little set up.
__________________
This is gonna get messy..........................
|
01-16-2012, 05:20 PM
|
 |
|
|
Join Date: May 2011
Location: moving to quesnel
Posts: 3,013
|
|
nice job guys .. wow some craftsmen out there i see
__________________
Do not squander time, for that is the stuff life is made of.......Ben Franklin
|
01-16-2012, 05:32 PM
|
 |
|
|
Join Date: May 2007
Location: Dreadful Valley
Posts: 14,621
|
|
__________________

There are no absolutes
|
01-23-2012, 09:51 PM
|
|
|
|
Join Date: Sep 2009
Location: Lethbridge
Posts: 2,045
|
|
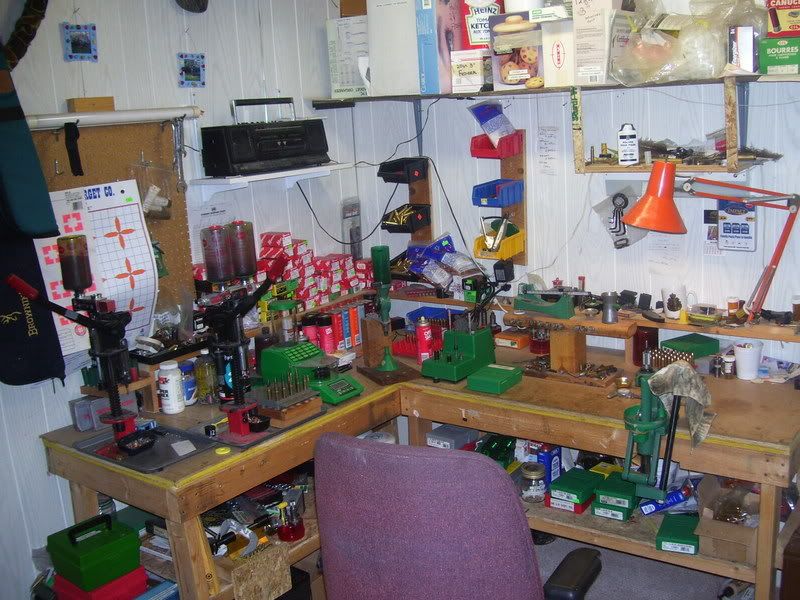
Heres another one, great bench. Only one press is bolted down, for everything else I use C-clamps, Saves alot of room! I found cedar 4x4's for the legs as they were cheaper than pine, LOL, go figure. Took me about 8 hrs with a skill saw( couldn't get anything strait with the chainsaw), tape measure and zero wood working exp. Table saw would have been easier! Lacquer finish, would use arborite if I had to do it again. Very solid Bench.

__________________
"Unthinking respect for Authority is the greatest enemy of truth"
Albert Einstein
|
01-23-2012, 11:09 PM
|
|
|
|
Join Date: Oct 2007
Location: Calgary
Posts: 209
|
|
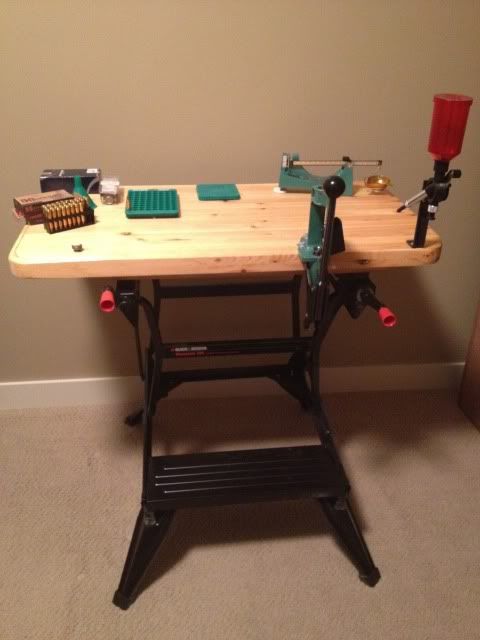
Here's my portable bench, easy take down. Was thinking I could take it to the range for load development but that hasn't happened yet.
|
 Posting Rules
|
You may not post new threads
You may not post replies
You may not post attachments
You may not edit your posts
HTML code is Off
|
|
|
All times are GMT -6. The time now is 09:32 AM.
|


 Hybrid Mode
